Page 1 of 1
How To Make Trees Using Curvy 3D 2.0
Posted: Wed Apr 14, 2010 10:50 am
by Demona
Hello,
Would someone give me some help here? I'm new to curvy and have only a basic idea of the shapes and edit menus. I've been trying to sculpt a tree trunk with a few limbs and roots. My hope is to be able it create it using only one object. I've started out using either the lathe and the line tool. Then stretching it in various directions by trial and error. The results have not been too bad. (See pic below) but because of all the stretching the textures will end up also stretched in those areas. Then lines in the background of the pic are there because I'm showing it in a sculpty preview program.
Thanks,
Demona

Posted: Wed Apr 14, 2010 3:11 pm
by Demona
I suppose I'm partially answering my own question (wouldn't be the first time LOL) . After playing with the 'alt/right mouse' buttons, I'm getting some interesting effects here. also shift/r-mouse and control/right mouse...very neat!
Posted: Wed Apr 14, 2010 8:32 pm
by sculptor
in curvy you could use lots of objects
a lathe for the trunk
and lines for branches
then do a merge on them to produce a single object
should be able to make very good trees

edit:
there are plenty of tips in the tutorial section and across the forum
have fun
Posted: Thu Apr 15, 2010 5:43 pm
by Demona
Hello Again,
This is for Second Life Sculpties. Here is what I tried for:

When I merged objects and exported, this is what I got:

I seem to remember while learning sculpties in Second Life, that a Second Life sculpt must have exactly 1024 vertices. No more or no less. In other words, you cannot subtract or add from the topography of the sculpt.
So far I have not been able to find a program that is able to work around that. Correct me if I'm on the wrong path here.
Thanks,
Demona
Posted: Thu Apr 15, 2010 10:24 pm
by Simon
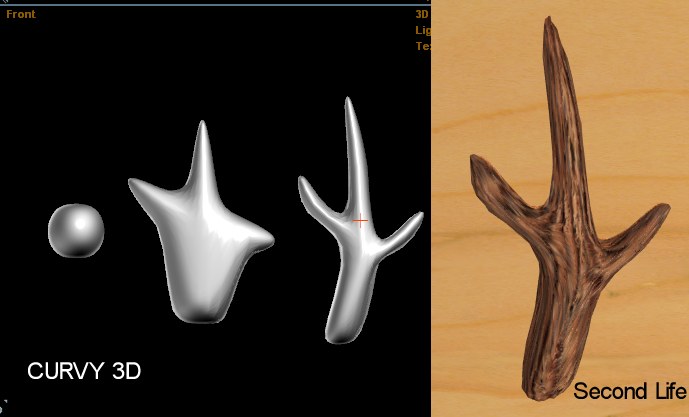
I began with a round Lathe, and set the resolution slider to 2000 before converting to a mesh (press 'K' making sure to be in Sculptie Mode)
Then you can see a similar level of detail to in SL while you sculpt and carefully balance out the areas that recieve more or less polygons.
I pulled out the branch from the top win Widget move tool set to 50% radius, and from the sides with 30% radius. I pulled from the bottom using a square shaped widget tool (drag on the shape in the widget properties panel to change the effect shape). Then use Smooth (press S) to clean up any jaggies. You could also use the warp smooth brush for more control of this process.
See the result uploaded to SL below:

The problem you go with your example is that Merge changes the UVs so they are no longer sculptie-ready. There are ways around this by Inflating a sculptie-ready shape to fit your merged shape - there is a tutorial for that
here.
To avoid stretching the texture I recommend you use a high-res texture and paint it for the object in Curvy - that way you can scale the details to appear unstretched - even though in the 2D texture map they will look scrunched up.
Posted: Fri Apr 16, 2010 12:48 am
by sculptor

sl model untextured
curvy pic bottom left corner
sorry hadn't realized sl target wanted

put curvy in sculptie mode
draw a very simple pole using a lathe
set resolution 2000
convert to a mesh with k key
then pull out branches using widgit move tool
p.s. this model took about 30 seconds (just to demonstrate )
Posted: Fri Apr 16, 2010 4:50 pm
by Demona
Ok Great! Thanks so much for the help Simon and Sculptor. I'm getting somwhere now by using the widget move. So nice that the size and shape of that tool can be changed as needed. Here is what I got:


On the inworld model I decreased it length on the Z axis a bit.
I can't wait to try the other tutorial now.
Thanks so much!
Demona
Posted: Fri Apr 16, 2010 11:22 pm
by sculptor


