View Management
Views let you see your 3D models and 2D image maps. Around the corners of each
view are view controls.
View Layout
Choose a different view layout holding down the LMB on the little
square in the very top left of each view.
This image shows the view layout popup. You can see the three view layout
highlighted in red, this is the current layout.
|

|
Here you can see the view layout with three views chosen.
|

|
You can pick which view appears where by picking from the three
menus in the top right of each view.
In the image I held down the LMB on "Texture" to choose the "Curvy Map" view.
You can choose one of the 3D Views, a Lightmap or a Texture Map
to view from these menus.
|

|
View Menu
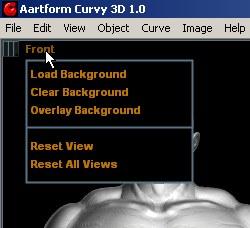
The name of the view appears in the top left, hold the LMB on this
name to open a quick view menu.
This menu lets you load and clear a background image for each view, which is
very useful for modelling from photos and sketches.
Choosing Overlay Background makes your background visible through any
objects you may have drawn, this helps line things up.
Reset View puts the view back to it's default zoom, pan, and
orientation: centering on the background and the centre of your 3D scene.
|
|
Activity Menu
The name of the current Activity appears in the bottom
right, hold the LMB on this to open a quick activity menu. This menu is an
alternative to using the menus at the top of the screen, and can be handy to
speed your workflow.
Here I have no objects selected so the Activity Menu defaults to the File
Activity where I can load and save objects and record scripts.
|

|
|
